Inexpensive Shabby Chic Storage Ideas

Image

Hello Readers!

I got an email this morning from Better Homes & Gardens DIY newsletter and they had great ideas for new shabby chic storage and organizational ideas.

Here is what I’m thinking I will post some of the photos from Better Homes and Gardens, but the tip I want to give you is: Get ideas before you go and once you are at the auction, flee market, or yard sale take a longer look at the items.  Try to think of what they CAN become rather than what they are, you’d be shocked at what a little paint could do.

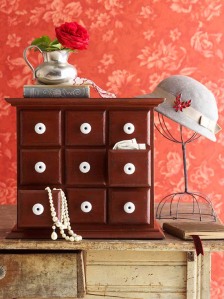
This is a vintage jewelry box.  They restained this piece along with replacing the knobs.

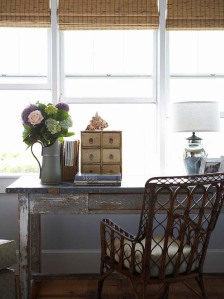
This is a beautiful rustic office.  It is essentially an all-in-one flee market find.  I am dreaming of the day I make this happen in our place.

This is an antique tool box.  Depending on the shape you find it in you will most likely need to line the drawers with some type of decorative fabric or wall paper.

How cool is this idea.  It is an old kitchen cabinet.  Again, condition is everything, you will most likely need to sand this and repaint it, if in fact you do find one of these treasures.

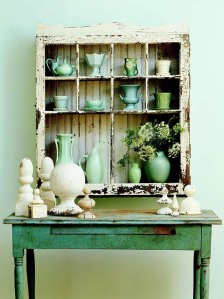
Simply BEAUTIFUL.  I have never found a window even somewhat similar to this one, but hey you never know what you will find.  This is a great, creative, way to display dishes or for plants or photo frames, the possibilities are endless.

Old birdcage…. or a mail storage unit?  For the shelving inside this beautiful creation is created by dowel rods and plexiglass.  How fun would this project be?

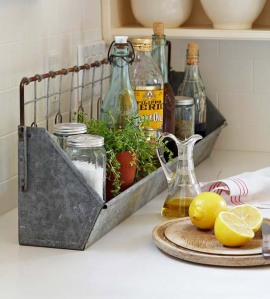
This is an old Chicken feed bin.  I’m not sure what kind of condition you may find this in, I haven’t ever seen one at an auction, however, I may not have recognized it either.


The weather is beginning to warm up, which means, good old fashion sweaty AUCTIONS! They are a blast, I really think you should at least go and watch one this season.


Salvage Style – Feat. Kent & Tammy Myers

Image

Someday I will have time to post something new everyday, but for now I am going to have to find peace with posting when I can.

Recently my Dad sent me a picture of a project he was working on.  He called it ‘Salvage Style’ and I was reminded what makes me, me!  My parents taught me a lot but two major characteristics stand out, that both my Mom and Dad contributed to the make-up of me, and those being; creative and resourceful.  I can remember several times that my mom would bring home a picture of something and my dad would construct her dream project into a reality.  Depending on how large the project was, my dad, often was able to use scrape wood or used items finding them anywhere and everywhere.

This slideshow requires JavaScript.

‘Salvage Style’ was found from the Magazine This Old House.

This project materials are:

A pulley ($10-$12)

Sisal Rope (Typically bought in bulk, 50ft=$9)

Wiring (Had on hand) – This is very typical of my dad, he has a detached garage that he works in with everything you can imagine, we have spent many wonderful hours working on projects together.

Light Socket ($4)

My heart swells up when I talk about my Dad because his handyman skills and captivating personality are the perfect mix.  He is patient and answers all of my badgering questions, and let me tell you I ask A LOT of questions.  I am a child soaking in all of his craftsman knowledge and wisdom.

If you are interested in finding DIY projects here are a couple resources that my dad and I have used in the past;

http://www.lowescreativeideas.com/Home.aspx

http://www.bhg.com/

Pinterest.com (under the DIY tab)

Have fun searching for YOUR next project.

Pawn Shop Maddness

Standard

Mikey and I decided that this year for Christmas we would pool our money together and buy a camera together as each other Christmas gift.  As I began thinking of different styles of cameras and of course immediately became overwhelmed.  We would love to have a very nice camera but we just don’t have it in the budget to buy the ultimate camera right now so after discussing this with a friend of mine she gave me some great advice.  She bought a new camera for their family at a pawn shop, it was in great condition and it was $65.  I started to think more and more about this idea and talked to Mikey about it then we came up with a plan.  I had an white gold necklace from an ex-boyfriend that I hardly wore anymore.  The chain was a little too long for me, so I asked Mikey to sell the necklace and with that money we would then buy the camera.

Off on the adventure Mikey went.  He walked into between 7-9 places for an estimate on the necklace.  They ranged from $25-$110.  We went with the $110.  As Mikey was having the necklace estimated he was looking through their store at cameras and calling me so I can look at each one online.  Mikey walked out of one shop with $120 in cash and walked into another Pawn shop and bought an Olympus camera for $150 (retail price: $230) which means we paid, $40 out of pocket. The camera is waterproof and can be dropped and won’t break.  This is the first time I have really had Mikey take time to get the best deal and he was completely on board with the idea, probably because it involved some bargaining/negotiating, a skill to which he has been gifted.

Tip: Though Pawn shops may be a bit intimidating, that doesn’t mean it is worth it to pay full price for something you CAN find somewhere else cheaper.  Don’t let someone or something effect your effort in living a thrifty life.

Sometimes things might seem frightening, but most of the time a fear or something is due to lack of experience, no one wants to feel silly walking into a place just to feel overwhelmed, however, if you try it at least once, I truly believe the accomplishment of saving money will keep you wanting more.

I hope you feel inspired to try knew things and become independent in your journey of thrift’ing.

Babysitting Adventure!

Standard

Today Mikey and I are babysitting a family that we know through Young Life.  The two older kids are busy and because of the crazy winter weather our plans to drive to Indy were changed last night.  As Mikey and I thought about how to entertain these kids we both were throwing out ideas when I suggested a Scavenger Hunt in Target.  I’m not %100 positive it should be called a Scavenger Hunt but this is what we came up with.

Each boy has $10.  We are going to Target and this is their list of items they have to find:

Q (Boy, 9 years old)

*Something that has to do with Hockey. (Anything)

*It hangs on keys and shines light in dark places (Flashlight key chain)

*Something with a duck on it (Anything)

*It peels and it is yellow (A Banana)

*This sweet item’s saying is: “Taste the rainbow” (Skittles)

I (Boy, 11 or 12 years old)

*An item that magnify the words on a page (Hint: you can wear this) (Magnify glasses)

*Item (s) you can blow-up with air or fill-up with water and it/they come in many different colors (Water Balloons)

*Small enough to fit in ____’s (their dog’s name) mouth.  It bounces (Tennis Balls)

*Square and Flimsy.  Royalty’s pictures are on three of each suit. (Playing Cards)

*Candy that is deathly sour, but if you can last long enough the sweet center is worth it. (War Heads)

Rules: Q can ask a Target Employee I cannot.  They have $10 and the first one to pay for everything and bring it to us wins.  The prize is, they get to pick the activity we do for the rest of the evening.  (We are giving them three options)

A good thing to do, is be creative.  Try to come up with things that will most likely cost less than going to Museum, but are active and fun for them.  We are also really good at keep things secretive but dropping hints to keep the anticipation rolling.

To be honest we will have just as much fun as they will.


Before/After Kitchen table and chairs

Standard

This slideshow requires JavaScript.

Remember the Kitchen table and chairs we found at an auction in New Haven, IN?  Here is the final look.  Mikey worked very hard to sand down all of the chairs and the table and then we painted each piece with a white eggshell paint.  Typically we put a bright green table cloth over the table, a wedding gift, to really brighten up the room and to match the kitchen with the dining room.

Halloween the Thrify way

Image

This slideshow requires JavaScript.

This year I needed to dress up for Halloween for two different occasions.  The day of Halloween I dressed up for work and then the weekend after Halloween we were invited to a party.   Needless to say, since being married I do not have extra funds lying around to spend on Halloween costumes, so I used my resources and came up with a very fun and creative idea.

The Supplies:
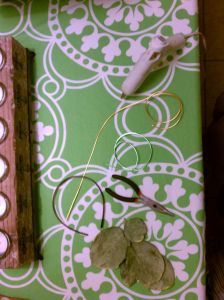
The day of Halloween I dressed up as a person caught in a wind storm.  It isn’t the easiest costume to construct but it is inexpensive and was a hit at the office.  First I went to Salvation Army one day during lunch and saw what tag color was 50% off and went directly to the scarfs.  For this costume a scarf is a must to get the full wind blown look effect.  The scarf was originally 60 cents, and since it was 50% off, I got it for 30 cents.

Second, I went to Goodwill on a weekend that they had 50% off of all of their clothes and since my scarf was brown I looked for a brown skirt and jacket.  I got the skirt for $2.00 and the jacket was $2.25.  I then went to Dollar Tree and picked up some adjustable wire.  Just a side note, the wire I purchased was actually floral wire that you would put in bouquets, which was extremely flimsy and I had to double the wire up while constructing the costume.  If you don’t have fake floral leafs at home, I would have gone outside and picked some up off the ground and used them.

Things you have at home that you’ll need: hot glue gun, wire cutters, safety pins (4-6), bobby pins and a headband (optional)

Constructing the Costume:

Flip the skirt inside out and with the wire measure the length you will need, should be the length of the inside seam of the skirt.  Hot glue the wire near the seam of the skirt.  Then hot glue another wire about 2 inches from the first wire, once you bend it in the direction of your choice it will look like the skirt has a ripple from the wind.

The jacket was kind of tricky for me to get right.  I hot glued a wire starting right underneath the armpit (same side that you choose to have the wind blowing) and then mid way to the back of the jacket.  I then took the other side of the jacket and safety pinned it to my shirt so that it would stay.

The scarf it probably the easiest piece.  Put the scarf on and tie it comfortably around your neck and measure the length from the knot to the end of the scarf on both pieces.  Then, lay the scarf on a flat surface and tied knots at the length measured previously, so you have a reference for the length of the wire.  Then hot glue the wire on the inside of the scarf at both ends.  After it dries then put tie it around your neck comfortably and position one end higher than the other.

I hot glued a leaf to one of my headbands as well (optional).

At the last minute I added the newspaper to my leg.  I took one of my stretchy headbands (same color as my tights) and one piece of a newspaper.  I wrapped the headband around my leg then took two safety pins and pinned it to the headband.

Now the hair. I did in fact put wire in my hair.  I didn’t wash my hair with conditioner that morning so that it would be a bit more coarse.  I teased my hair and put it in a pony tail.  I added three different pieces of wire and then teased and wrapped my hair around the wire.  I put attached a bobby pin to the hair and the wire to help it’s stability as well.  I, then, bobby pinned the leaf to my hair and hair-sprayed my bangs to the same side as the rest of my clothes/scarf/ and hair.

Once you put everything on bend the wires in the direction that you choose and walk tall cause you just made an amazing Halloween Costume for right around $8.00 and that feels good.

The second costume was my husbands idea.  I think he secretly wishes we lived in the south so he could have an accent.  We were a white trash couple.  The entire outfit cost about $3.80  I went to salvation army and found that fantastic shirt he is wearing, it was $.90 and the shirt I’m wearing was $.90 as well.  My husband had an old pair of work pants that he ripped up a bit more.  We cut the sleeves off his shirt and cut the bottom off a bit more so his belly would show.  He borrowed a pair of work boots from a friend, he was also carrying around a 40oz bottle of beer that we bought.  I already owned my jean jacket, jeans, and boots.  I wore big hoop earrings and very dark make-up.  It was a ton of fun!

My tip is: The more creative you are, the less expensive costumes will be.

Find ideas from the internet, search through the news and see who is really hitting the tabloids hard.  Go to your closet and see what you have to work with and when you do have to buy something, try to spend as little as possible.

Have a blast and Happy Halloween!
Wedding Planning Tips & Resources

Standard

My life revolves around recycling clothes, so why would I want my wedding to be any different?  For Mikey and I’s wedding I tried my very best to buy as few decorations as possible and we either borrowed or bought materials from 2nd hand stores that we could make our own.  My Mother-in-Law helped a lot with this process and I will be posting pictures and descriptions of the work we did in preparation for the wedding.


If you have a smaller budget then the average wedding, I would suggest three things;

1) Have a longer engagement (10 months)

2) Do not stop looking until you are satisfied with a price

3) Negotiate.

The reason why I suggest a longer engagement is because when you are running out of time, your stress level sky-rockets and you are more liable to accept the first cost you see.  Another reason a longer engagement is beneficial is because venues, photographers, etc. book quickly and if they have a good price then I will guarantee they won’t be available for a last minute booking.   Also, when things come down to the wire businesses might charge more for last minute decisions and none of these things make small budget wedding plans fun, that is the most important part too!

When looking for prices/cost of everything pertaining to a wedding use any resource you can possibly think of.  Two of the most expensive departments in your wedding budget are the photographer and catering.  When I first starting looking for a photographer I search facebook, I searched all my friends profiles and their websites.  I also asked my friends, I have close family friends that independently contract with several bridal shops and wedding venues and I am telling you when you call a business with a positive connection you will be amazed at what falls in your lap.

I found several small business photographers that typically shoot family photos or newborns/baby photos, but if I thought they were unique and would photograph a wedding well I would contact them and began negotiating.  I told them they could use our pictures as promo’s for their business, I negotiated the number of hours we would need them there, and I negotiated package deals.  Remember these are small business owners and are their own boss, they can and will say yes and no to your offer, but until you ask you won’t ever know.  In the end, our photographer and I made a deal; we will get a free photo album with around 250-300 printed photos and I will give their daughter Sign Language lessons for 15 weeks.  Be brave, put on your game face, and get going.

I want to feature a website I found towards the end of my wedding preparations, so I didn’t get to utilize the main purpose of the site.  The website is called Once Wedwww.oncewed.com.  It features used wedding dresses, they are all in great condition and reasonably priced.  They also have wedding ideas and Do-It-Yourself Weddings, which is my favorite part.


My boots are made for shopping

Standard

This slideshow requires JavaScript.

This post won’t be terribly long, I just needed to get my blog fix.  My wedding is in 16 days!! I will be able to post some of the wedding decorations after the wedding as well, maybe give you some cheap ideas.  The images above are of a dress and cowboy boots that I found at thrift stores.  The boots I found at a Goodwill in New York City.  I went to visit a close friend of mine named, Brooke.  She was there for a college internship and once my spring break rolled around I was ecstatic to go visit her.  Brooke had never gone to a thrift store before, what a better place then to experience the finest of fine New York thrift stores.  Those boots were designed by Jessica Simpson and were maybe $14, it would have been silly for me not to pick them up.  The dress I bought for a thrift store in the Midwest.  In the fall and spring I pair that dress with a jean jacket and the boots.

Tip #4: Jackets/Suit Jackets are one of the essentials.

Jackets and Suit Jackets can be very expensive, however, they really do help dress an outfit up.  Typically thrift stores have gobs of jackets and at Goodwill they are $4.00 and at Salvation Army, they vary but are most likely cheaper than Goodwill.  If you go to Goodwill on a weekend when they are offering %50 off, jackets are a MUST stop item, when are you ever going to find a jacket for $2.00?

This weekend Northeast Indiana’s Goodwill Stores are offering %50 off! Get to scooting.